In this lesson, we're going to build an API that outputs data in JSON format, so that we can make AJAX calls to it from the Messaging page.
Creating an endpoint for users
We'll start with the user data. We want to be able to make a GET request to /api/users/1 and receive the data for the user with ID 11 in JSON format.
As always when it comes to creating new routes, we'll start in the router.ex file. This time, we're going to create a brand new scope under the /api namespace, where we'll keep all our API routes. That way, we can clearly distinguish between the routes that output HTML, and the ones that output JSON.
# lib/messengyr_web/router.ex

defmodule MessengyrWeb.Router do

  # ...

  scope "/api", MessengyrWeb do
    pipe_through :api

    resources "/users", UserController, only: [:show]
  end
end
As you can see, we pipe the request through the predefined :api pipeline, which makes sure that our request only uses JSON. We then use the resources function, which automatically creates RESTful endpoints for creating, getting, editing and deleting users. For now, we only want to be able to get a single user, so we'll limit the endpoint to only GET /users/:id, which is tied to the :show function.
After that, we create our UserController containing a show function, which will only output the user ID in raw text for now. To make things clearer, we're going to put all of our API-related controllers in a new api-folder, which in turn is inside the default controllers-folder:
# lib/messengyr_web/controllers/api/user_controller.ex

defmodule MessengyrWeb.UserController do
  use MessengyrWeb, :controller

  def show(conn, %{"id" => user_id}) do
    conn |> text(user_id)
  end

end
If you hit the endpoint /api/users/1 in your browser, you should see that number:
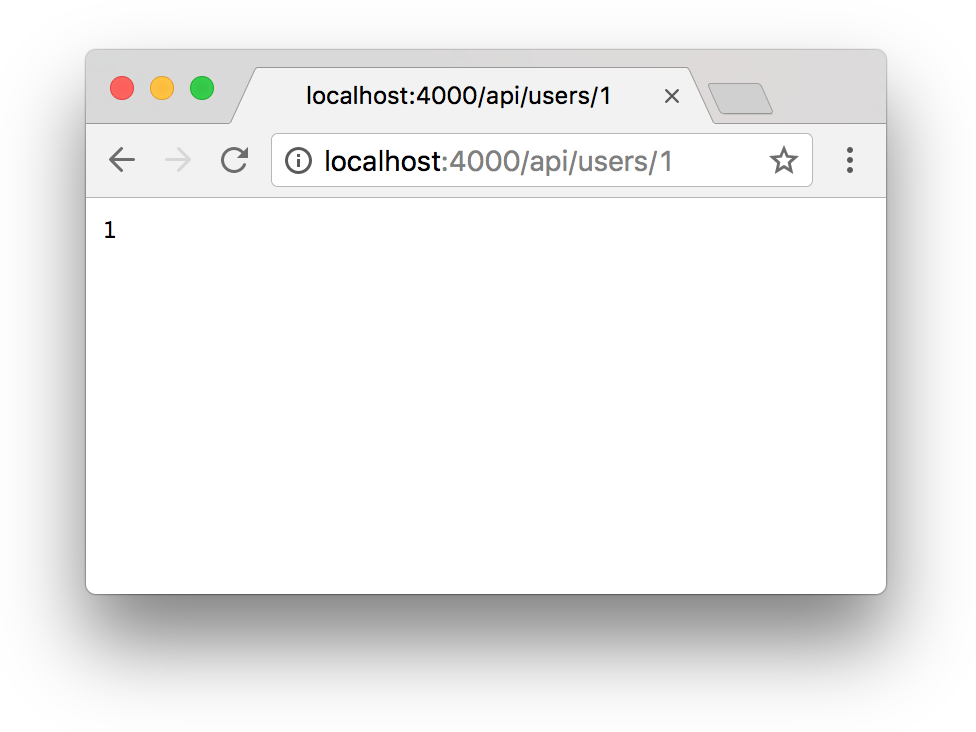
Our route is working! Next, we want to fetch the user from the database using the ID. We could do this using the Repo-module straight in the controller, however, it's good practice to keep the business logic out of the web-folder, so that everything in web only acts as the web-layer for your broader application. Therefore, we'll instead create a get_user/1 function in our Accounts-module that the controller can call:
# lib/messengyr/accounts/accounts.ex
defmodule Messengyr.Accounts do
# ...
def get_user(user_id) do
Repo.get(User, user_id)
end
# ...
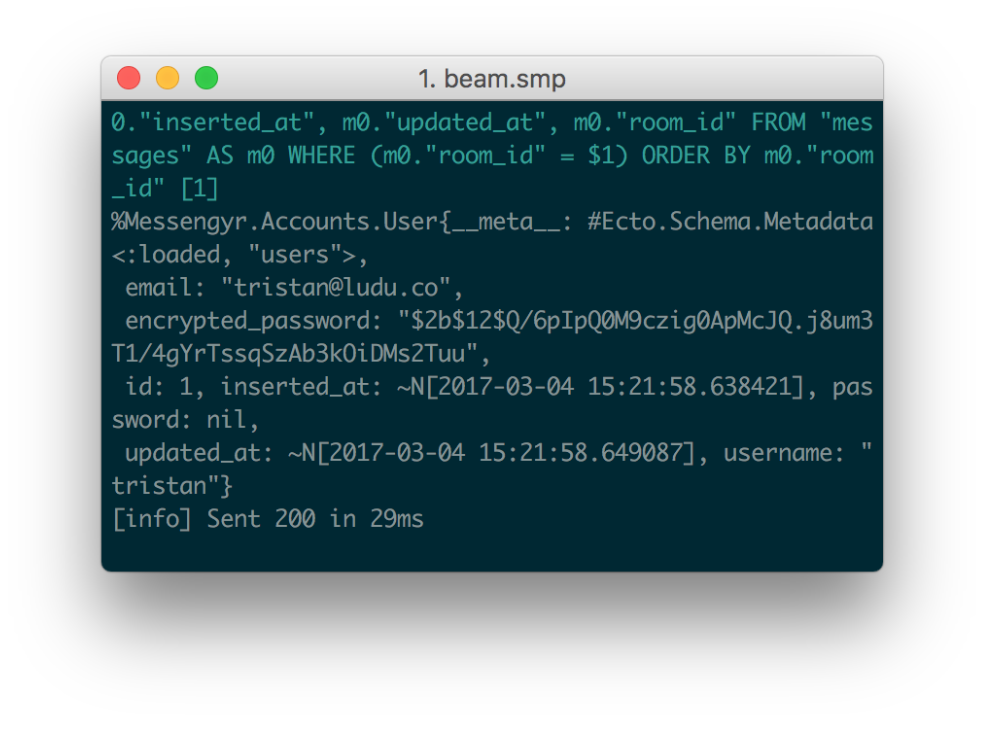
endNow we can easily fetch the user and call the render/3-function to invoke the UserView. Remember to pass in the user struct as a parameter, otherwise we won't be able to show any data.
# lib/messengyr_web/controllers/api/user_controller.ex

defmodule MessengyrWeb.UserController do
  use MessengyrWeb, :controller

  alias Messengyr.Accounts

  def show(conn, %{"id" => user_id}) do
    user = Accounts.get_user(user_id)

    render(conn, "show.json", user: user)
  end

end
Notice that the second argument is "show.json". This is passed in so that we can distinguish between our endpoints.
No matter if we want to show, edit or delete one or multiple user, we'll always have to call the render/3-function. However, we might want to structure our JSON differently based on what the endpoint is, so we need to specify what **kind of action **we're performing. In this case we want to :show a user -- therefore we render the show.json-template.
Now we need to create this UserView module. In it, we will have a render/2-function, which will use pattern matching to match the string "show.json". Then we just need to return a map, and Phoenix will automatically transform it into JSON object, thanks to the pipeline we're using. We'll put this file in a new api-folder inside of view, in order to distinguish between HTML-views and JSON-views:
# lib/messengyr_web/views/api/user_view.ex

defmodule MessengyrWeb.UserView do
  use MessengyrWeb, :view

  def render("show.json", %{user: user}) do
    %{
      user: user_json(user)
    }
  end

  defp user_json(user) do
    hash_email = :crypto.hash(:md5, user.email) |> Base.encode16 |> String.downcase
    avatar_url = "http://www.gravatar.com/avatar/#{hash_email}"

    %{
      id: user.id,
      username: user.username,
      avatarURL: avatar_url,
    }
  end
end
As you can see, we're not outputting the entire user struct, because we don't want to leak insecure information like the encrypted_password! Instead, we create a new map in a user_json/1-function, where we cherry-pick the info that we want to show. We also create a "computed property" for the avatarURL using the user's email, just like we did in our LayoutView before.
After this, you should be able to refresh the page and see your user rendered as JSON. Make sure that the ID you set in the URL is one that actually exists in the database! My user has an ID of 11, but yours might very well be 22 or 33.

If your JSON isn't rendered as nicely as the one in the picture above, I recommend that you install a browser plugin like JSON formatter for Chrome, to make it readable.
Fallback controllers
Our endpoint works great as long as the user ID that we look for is one that actually exists. However, if we try to fetch one that doesn't, the app crashes and you get a generic error page:
 This is what you get if you try to fetch the user with ID 3 for example.
But we want to show a nice JSON error instead! So how do we accomplish that? We could have a simple if-statement that invokes different render/3-functions based on if user is nil or not, like this:
# lib/messengyr_web/controllers/api/user_controller.ex

defmodule MessengyrWeb.UserController do

  # ...
  # Don't copy this into your own file!

  def show(conn, %{"id" => user_id}) do
    user = Accounts.get_user(user_id)

    if user do
      render(conn, "show.json", user: user)
    else
      # user is nil:
      render(conn, "error.json", "No user found!")
    end
  end

end
However, this can quickly get very repetitive, since we'll probably want to render the same "error.json"-view in other situations, where the only difference is the error message. We don't want to clutter our code with a bunch of else-statements in every function!
Instead, I want to show you a new feature in Phoenix 1.3 called fallback controllers! The concept is simple: whenever your controller action returns something other than a conn, it will invoke the call/2-action on the fallback controller instead. Knowing this, we can remove the else-part in our previous code, and instead specify the fallback controller that we want to use:
# lib/messengyr_web/controllers/api/user_controller.ex

defmodule MessengyrWeb.UserController do

  #...

  # Add this line:
  action_fallback MessengyrWeb.FallbackController

  def show(conn, %{"id" => user_id}) do
    user = Accounts.get_user(user_id)

    if user do
      render(conn, "show.json", user: user)
    end
  end

end
Now we need to create a fallback controller with a call/2-function. Since we know that Accounts.get_user/1 returns nil if it cannot find the user we're looking for, we can pattern match against nil in the call/2-function to handle this use case:
# lib/messengyr_web/controllers/fallback_controller.ex

defmodule MessengyrWeb.FallbackController do
  use MessengyrWeb, :controller

  alias MessengyrWeb.ErrorView

  def call(conn, nil) do
    conn
    |> put_status(:not_found)
    |> render(ErrorView, "error.json", message: "The resource couldn't be found!")
  end

end
As you can see, we're using the ErrorView in the function, with "error.json" as the second parameter. The last step is therefore to pattern match against the "error.json" string in the ErrorView and return a map that renders the JSON message:
# lib/messengyr_web/views/error_view.ex

defmodule MessengyrWeb.ErrorView do

  # ...

  def render("error.json", %{message: message }) do
    %{
      error: %{
        message: message
      }
    }
  end

  # ...

end
Now, if you try to get a user that doesn't exist, you'll get this pretty error instead!
Tables for our rooms and messages
We can now display our users in JSON format, but for our Chat app to work, we also need to be able to show rooms and messages in JSON. For that, we first need to create database tables for this data, so we'll use Mix to create three database tables: messages, rooms and room_users (which connects users to rooms).
Before we go ahead and create the schema for these tables, let's plan our folder structure a little bit. We previously created an Accounts-context to hold our user schema and everything related to authentication. This time, it makes sense to have a Chat-context, since messages, rooms and room_users are all related to chatting in some way.
With that in mind, open a new terminal window and run the following three commands:
mix phx.gen.schema Chat.Room rooms

mix phx.gen.schema Chat.Message messages text:string

mix phx.gen.schema Chat.RoomUser room_users
After you've run the commands, you should have a folder structure that looks like this.
Now we need to slightly tweak the migration files that were generated in the priv/repo/migrations-folder before we run them.
Our first migration file which creates the rooms table actually doesn't need to be changed. It will only contain the ID of the room (plus the created_at and updated_at fields), which is added by default.
Next up is the migration file for messages. Apart from the text column, we also want this table to contain one foreign key that links to rooms (= the room that the message was written in) and one that links to users (= the user that wrote the message). For that, we use references:
# priv/repo/migrations/xxx_create_messages.exs

# ...

  def change do
    create table(:messages) do
      add :text, :string

      # Add these two rows:
      add :room_id, references(:rooms)
      add :user_id, references(:users)

      timestamps()
    end

  end
Finally, we'll add the same foreign keys to the room_users table. Since a room can contain multiple users, while at the same time users can be members of multiple rooms, we have a "many-to-many" relationship. We should therefore use room_users as a join table (a.k.a. "associative entity") to form a link between the two. We also want to make the user-room combination unique, so that a user can't join the same room twice.
# priv/repo/migrations/xxx_create_room_user.exs

# ...

  def change do
    create table(:room_users) do

      # Add these rows:
      add :room_id, references(:rooms)
      add :user_id, references(:users)

      timestamps()
    end

    # And this index:
    create unique_index(:room_users, [:room_id, :user_id])

  end

# ...
Now that we've decided what the table structures should be, let's run our migration!
mix ecto.migrateHopefully the migration ran successfully, and your database now has three new tables!
Seeding your database with data
We now want to add some initial data to our newly created tables so that we can try to retrieve that data as JSON later. Before we do this though, we should update the schemas for our new Ecto resources, so that they are always aware of the relationship they have to each other when we tinker with them.
The rooms table doesn't have any special columns, so we don't have to update anything in its schema either. However, the messages and room_users tables contain foreign keys that need to be taken into account if we later create a new Chat.Message or Chat.RoomUser struct!
We'll start with the schema for Chat.Message. Here we want to specify a room-field that's connected to the Chat.Room module, and a user-field that's connected to the Accounts.User module. To do that, we simply use belongs_to in its schema:
# lib/messengyr/chat/message.ex

defmodule Messengyr.Chat.Message do
  # ...

  # First, alias the modules we need:
  alias Messengyr.Chat.Room
  alias Messengyr.Accounts.User

  schema "messages" do
    field :text, :string

    # ... then add these 2 fields:
    belongs_to :room, Room
    belongs_to :user, User

    timestamps()
  end
end
Next, we'll do exactly the same thing with the schema for Chat.RoomUser. Since its database table has the same foreign keys (room_id and user_id), we'll add the same belongs_to-functions to the schema:
# lib/messengyr/chat/room_user.ex

defmodule Messengyr.Chat.RoomUser do
  use Ecto.Schema

  alias Messengyr.Chat.Room
  alias Messengyr.Accounts.User

  schema "room_users" do
    belongs_to :room, Room
    belongs_to :user, User

    timestamps()
  end
end
Great! Now our schemas are complete. Our next step is to add some functions that let us easily create new rooms, room users and messages. For this, we're going to create a new context file in the chat-folder, simply called chat.ex.
This is in tune with what we did with our accounts-context earlier. We have an accounts-folder containing an accounts.ex-file which serves as our public API to do anything related to users. This time, we want our new chat.ex-file in the chat-folder to serve as the public API for anything related to messaging. We'll keep this file very simple for now with just three functions: create_room/0, add_room_user/2 and add_message/1. Here's what the file looks like:
# lib/messengyr/chat/chat.ex

defmodule Messengyr.Chat do

  alias Messengyr.Chat.{Message, Room, RoomUser}
  alias Messengyr.Repo

  def create_room() do
    room = %Room{}
    Repo.insert(room)
  end

  def add_room_user(room, user) do
    room_user = %RoomUser{
      room: room,
      user: user,
    }
    Repo.insert(room_user)
  end

  def add_message(%{room: room, user: user, text: text}) do
    message = %Message{
      room: room,
      user: user,
      text: text,
    }
    Repo.insert(message)
  end

end
That's it! Now that we have these functions, we can easily call them with some parameters to add new records to our database. We could do this from IEx, but Phoenix actually has a special file whose purpose is specifically to initialise the database with data. You might have stumbled upon this file already -- it's the one called seeds.exs in the priv/repo-folder. Let's call our functions there!
Open seeds.exs, remove the comments, and paste in the following chunk of code:
# priv/repo/seeds.exs

alias Messengyr.{Chat, Repo, Accounts}
alias Messengyr.Accounts.User

# Create a new room:
{:ok, room} = Chat.create_room()

# Fetch my user (the first one in the table):
me = Repo.one(User)

# Create a counterpart user:
{:ok, counterpart} = Accounts.create_user(%{
  "username" => "bob",
  "email" => "bob@example.com",
  "password" => "test",
})

# Add myself as a room_user:
Chat.add_room_user(room, me)

# Add the counterpart as a room_user:
Chat.add_room_user(room, counterpart)

# Add a message in the room:
Chat.add_message(%{
  room: room,
  user: me,
  text: "Hello world!",
})
The comments in the code above are probably enough for you to understand what should happen, but just in case it's unclear, here's the flow:
-
Create a new room
-
Add our own existing user to it
-
Create a new user called "bob"
-
Add him to the room as well
-
Add a message in the room from me to "bob" saying "Hello world!"
To execute this code, simply run this command in a new terminal window:
mix run priv/repo/seeds.exs
 When you run it, you'll see all the queries being executed in SQL.
You should now have some more data in your database that we can play around with!
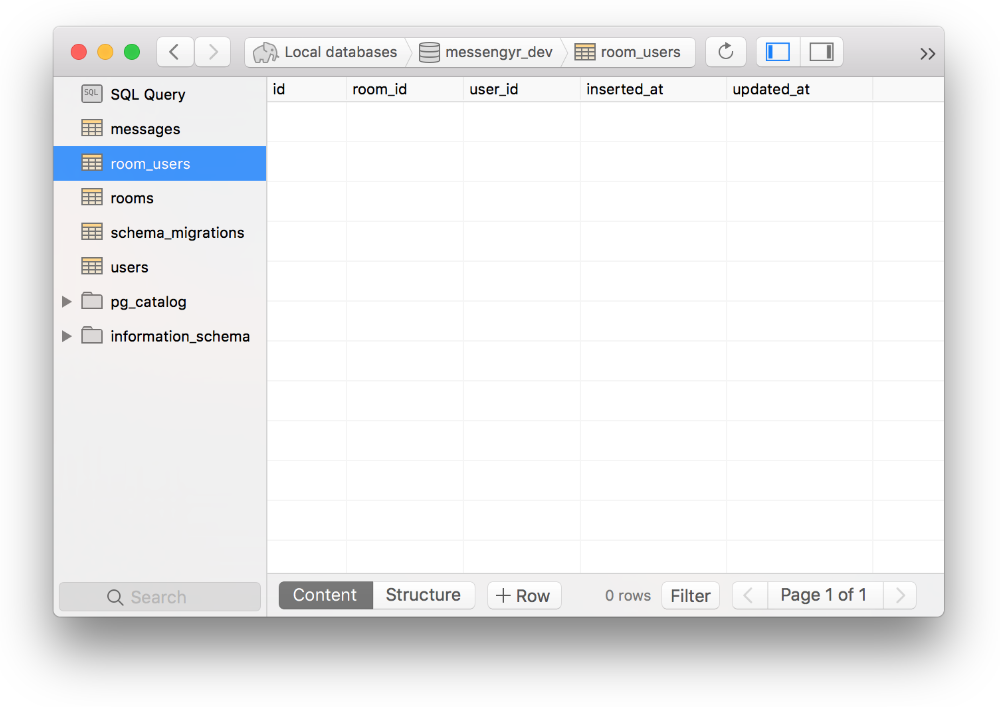
 You should have two rows in the "room_users" table. Note that your IDs might differ from the ones in this screenshot -- that's ok!
Showing the rooms in JSON
Now that we have some data for our rooms, let's work on displaying that data in JSON format!
The first thing we want to do is display all the existing rooms by visiting /api/rooms. For that, we need to add a new resources route in our router, similar to the one we have for /users.
# lib/messengyr_web/router.ex

defmodule MessengyrWeb.Router do

  # ...

  scope "/api", MessengyrWeb do

    # ...

    # Add this line:
    resources "/rooms", RoomController
  end
end
One handy command that you can run after creating a new resource like this is mix phx.routes. That way, you can get an overview of all your routes and which controller functions they are connected to:

Here we can clearly see that if we hit GET /api/rooms to show all rooms, we need to have an index function in our RoomController, so let's create that! We'll put this new controller file in the api-folder again, to distinguish it from our non-API related controllers:
# lib/messengyr_web/controllers/api/room_controller.ex

defmodule MessengyrWeb.RoomController do
  use MessengyrWeb, :controller

  def index(conn, _params) do
    text(conn, "Show all rooms!")
  end

end
Test it in the browser to make sure that it works!
Next, since we want to keep the business logic out of the controller, we'll create a list_rooms/0-function in the Chat context module. We can then call this function from our controller and send the result to the view with render:
# lib/messengyr/chat/chat.ex

defmodule Messengyr.Chat do

  # ...

  def list_rooms do
    Repo.all(Room)
  end

  # ...

end
# lib/messengyr_web/controllers/api/room_controller.ex
defmodule MessengyrWeb.RoomController do
# ...
alias Messengyr.Chat
def index(conn, _params) do
rooms = Chat.list_rooms()
render(conn, "index.json", rooms: rooms)
end
endAs you probably guessed, we now need to create the RoomView, where we'll have the render/2-function and our own private room_json/1 function:
# lib/mesengyr_web/views/api/room_view.ex

defmodule MessengyrWeb.RoomView do
  use MessengyrWeb, :view

  def render("index.json", %{rooms: rooms}) do
    %{
      rooms: Enum.map(rooms, fn(room) -> room_json(room) end)
    }
  end

  defp room_json(room) do
    %{
      id: room.id,
    }
  end

end
What's new in this file is the Enum.map/2-function. It might look complex, but if you look closely, you'll notice that it works in exactly the same way as JavaScript's map()-function -- it takes an array and creates a new array by "transforming" every item! In this case, we take the list of rooms, we map through it, and we transform every %Room{} struct that it contains into a JSON-friendly map with our room_json/1 function.
 And there's the result!
Preloading data
So we've managed to display a basic room record in JSON. However, this room data by itself is not very helpful since it's really just an ID. What we really want to show is the counterpart and the list of messages related to that room, structured in the same way as our fake-data.js-file on the frontend!
Le's start by tackling the list of messages first. We'll start by editing the schema of our Chat.Room so that this module is aware of its inverse relationship to Chat.Message. In this case, we know that one room contains many messages, therefore we use has_many:
# lib/messengyr/chat/room.ex

defmodule Messengyr.Chat.Room do

  # ...

  alias Messengyr.Chat.Message # Alias the Message module...

  schema "rooms" do
    has_many :messages, Message # ...and add this row!

    timestamps()
  end
end
Thanks to this has_many, and the fact that we have a belongs_to-relationship in our message schema, Ecto will now automatically know how to fetch messages for a room.
Next, we go back to our Chat module and use the pipe functionality together with Repo.preload:
# lib/messengyr/chat/chat.ex

defmodule Messengyr.Chat do

  # ...

  def list_rooms do
    # We pipe the result into Repo.preload:
    Repo.all(Room) |> Repo.preload(:messages)
  end

  # ...

end
This will fetch all the room's messages and add them to the struct! To verify that it works, you can use IO.inspect in the room_json function:
# lib/mesengyr_web/views/api/room_view.ex

defmodule MessengyrWeb.RoomView do
  # ...

  defp room_json(room) do
    IO.inspect room.messages # Add this line!

    %{
      id: room.id,
    }
  end

end
There's our "Hello world" message!
Now we just need to render this message into JSON too! We could define a message_json function directly in our room_view.ex file, however, it would make more sense to put everything related to rendering messages in a new message_view.ex file instead, don't you think? Let's create that file!
# lib/mesengyr_web/views/api/message_view.ex

defmodule MessengyrWeb.MessageView do
  use MessengyrWeb, :view

  def message_json(message) do
    %{
      id: message.id,
      text: message.text,
      sentAt: message.inserted_at,
    }
  end
end
The keys id, text and sentAt reflect the ones that we have in our fake-data.js file. We now import this message_json/1-function into our RoomView. Finally, we call the function inside an Enum.map, so that it loops through and renders all the messages, in the same way that we looped through and rendered our list of rooms earlier:
# lib/mesengyr_web/views/api/room_view.ex

defmodule MessengyrWeb.RoomView do

  # ...

  # Import the function from the MessageView module:
  import MessengyrWeb.MessageView, only: [message_json: 1]

  # ...

  defp room_json(room) do
    %{
      id: room.id,
      messages: Enum.map(room.messages, fn(message) -> message_json(message) end),
    }
  end

end
And here's the result!
Fetching user-specific data
In order to fetch the last missing piece of the room JSON -- the counterpart -- we first need to know which user is logged in.
You'll notice that if we try to inspect Guardian.Plug.current_resource(conn) in our RoomController to check the current user, it will return nil. Why is that? Shouldn't we be logged-in? Well, it turns out that we are logged-in, but there's currently no authentication check in the :api-pipeline in our router, so whenever we hit a route in the :api-pipeline, Phoenix sees no logged-in user. To quickfix this, we can add some of the same plugs that we have in our other pipelines, related to sessions:
# lib/messengyr_web/router.ex

defmodule MessengyrWeb.Router do

  # ...

  pipeline :api do
    plug :accepts, ["json"]

    # Add the following 2 plugs:
    plug :fetch_session
    plug Messengyr.Auth.Pipeline
  end

  # ...

end
Note that this is just a temporary fix, and we're going to remove these plugs from the api-pipeline in the next chapter. To authenticate yourself on an API, the best way is to set an access token in an Authorization header for every request you make. But for now, we just want to see the JSON result directly in the browser, so we can use the session plug just like we did with our HTML pages.
To make sure that it works, you can try inspecting the logged-in user in the index/2 function of the RoomController:
# lib/messengyr_web/controllers/api/room_controller.ex

defmodule MessengyrWeb.RoomController do

  # ...

  def index(conn, _params) do
    # Add these 2 lines:
    user = Guardian.Plug.current_resource(conn)
    IO.inspect user

    # ...
  end

end
If you reload /api/rooms in your browser, you should see your user struct. If not, you've probably been logged out. :)
In order to use this user in our views, we need to refactor our functions. We'll start with the controller: in our render/2-function, we want to pass the logged-in user under the key me, in addition to room:
# lib/messengyr_web/controllers/api/room_controller.ex

defmodule MessengyrWeb.RoomController do

  # ...

  def index(conn, _params) do
    user = Guardian.Plug.current_resource(conn)
    rooms = Chat.list_rooms()

    render(conn, "index.json", %{
      rooms: rooms,
      me: user,
    })
  end

end
Next, we head over to our RoomView and update our pattern matching so that we can extract me, and send it to room_json/2, which in turn will send it over to message_json/2:
# lib/messengyr_web/views/api/room_view.ex

# ...

  def render("index.json", %{rooms: rooms, me: me}) do
    %{
      rooms: Enum.map(rooms, fn(room) -> room_json(room, %{me: me}) end)
    }
  end

  defp room_json(room, %{me: me}) do
    %{
      id: room.id,
      messages: Enum.map(room.messages, fn(message) -> message_json(message, %{me: me}) end)
    }
  end

end
Since we're passing me to message_json/2, we need to update that function as well. We'll change the pattern matching for the arguments and also inspect me to make sure that it's been passed all the way down here as expected:
# lib/mesengyr_web/views/api/message_view.ex

defmodule MessengyrWeb.MessageView do
  use MessengyrWeb, :view

  def message_json(message, %{me: me}) do
    IO.inspect me

    %{
      id: message.id,
      text: message.text,
      sentAt: message.inserted_at,
    }
  end

end
Finally, since we've now updated the number of parameters in the message_json function (from 1 to 2), we also need to update our import statement on top of room_view.ex:
# lib/mesengyr_web/views/api/room_view.ex

defmodule MessengyrWeb.RoomView do
  use MessengyrWeb, :view

  # Put "2" instead of "1" as the number of parameters:
  import MessengyrWeb.MessageView, only: [message_json: 2]

  # ...

end
If you reload the page now, it should work exactly as before, except for the fact that we're logging me in the MessageView, which should be reflected in your console.
Alright, we now know who's logged-in! What's left is to also fetch the other users of the room. To do this, we'll preload the room's users, just like we preloaded the messages earlier. And similarly to what we did to Chat.Message, we need to update the schema inChat.Room so that it knows how it's connected to the schema in Accounts.User.
In this case, the relation is not as straight-forward as with the messages though. A room can have many users, but a user can also be a member of many rooms. Therefore, we use the many_to_many function, and we specify the name of the database table that connects the two (room_users):
# lib/messengyr/chat/room.ex

defmodule Messengyr.Chat.Room do

  # ...

  # Alias the User module first...
  alias Messengyr.Accounts.User

  schema "rooms" do
    has_many :messages, Message

    # ...then add this line:
    many_to_many :users, User, join_through: "room_users"

    timestamps()
  end
end
Now, we can preload the users just like we preloaded the messages in our context module:
# lib/messengyr/chat/chat.ex

defmodule Messengyr.Chat do

  # ...

  def list_rooms do
    # More piping!
    Repo.all(Room) |> Repo.preload(:messages) |> Repo.preload(:users)
  end

  #...

end
We now have all the data that we need sent to the RoomView. Using that, we can determine who the counterpart is. We create a private get_counterpart/2-function, which takes two parameters: a list of room_users and the logged-in user (me). In it, we use Enum to loop through the list of users until it finds the one whose ID isn't the same as the logged-in user's ID:
# lib/messengyr_web/views/api/room_view.ex

defmodule MessengyrWeb.RoomView do

  # ...

  defp get_counterpart(users, me) do
    Enum.find(users, fn(user) -> user.id != me.id end)
  end

end
Still with me? Good. We can now call get_counterpart/2 in the room_json/2-function, and then render the result (the counterpart) using the user_json/1 function! Note that in order for user_json/1 to work, we first need to set it as a public function (replace defp with def in web/views/api/user_view.ex), and we also need to import it into the room_view.ex file:
# lib/messengyr_web/views/api/room_view.ex

defmodule MessengyrWeb.RoomView do

  # ...

  # Import the user_json/1 function (make sure it's public!)
  import MessengyrWeb.UserView, only: [user_json: 1]

  # ...

  defp room_json(%{users: room_users} = room, %{me: me}) do
    # Get the counterpart:
    counterpart = get_counterpart(room_users, me)

    # Render the counterpart as JSON:
    %{
      id: room.id,
      counterpart: user_json(counterpart),
      messages: Enum.map(room.messages, fn(message) -> message_json(message, %{me: me}) end)
    }
  end

  # ...

end
After doing this, you should have a much more complete view of our room JSON:
 Yay, there's the counterpart!
Now you know how to render database data as JSON objects, as well as how to take advantage of the authenticated user to set computed values such as counterpart.
We still have some improvements left for our API, but we'll tackle those in the next chapter!